
The engine casings are made by rolling a good quality paper brushed with glue around a mandrel. Butcher paper or shelf paper are good sources of good quality inexpensive paper. The paper should be as dense and nonporous as possible. Paper like newsprint is not strong enough. Also, the thicker the paper is the easier it will be to roll a tight case. White glue such as Elmers® is used to produce a good solid tube when wound tightly.
Wooden dowels are available from 1/16 inch to 1 inch in diameter and are moderately inexpensive, so are used as a standard size for the inside diameter (I.D.). All other dimensions are based on this dimension. The proper size dowel is chosen for the size engine desired and a piece is cut off about 4 or 5 inches longer than the tube length. This will serve as the rolling mandrel.
Next, strips of paper are cut that are as wide as the engine will be long. Shorter strips 12 to 18 inches long are easier to work with. Strips can be cut accurately and very rapidly from a roll of paper if a cutting board of plywood, particle board, Masonite®, etc. with guidelines are used. (see Figure 6) The paper is pulled out to one guide line and then a straight edge is lined up with a second line and used to guide a hobby knife or sharp pocket knife to cut the strip.
It is much more efficient to cut strips for a large number of engine casings at one time so you will have a large supply to draw upon as you want them. If each process is done for a large number of engines at the same time, less total time will be required for the construction of each engine.
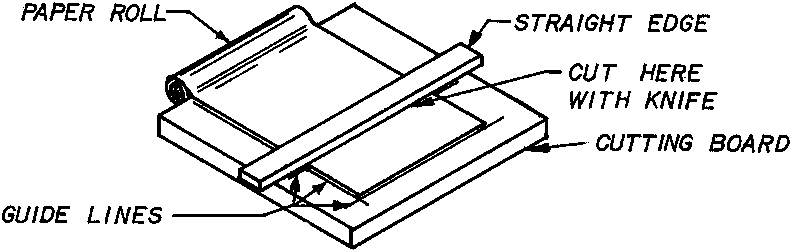
Figure 6
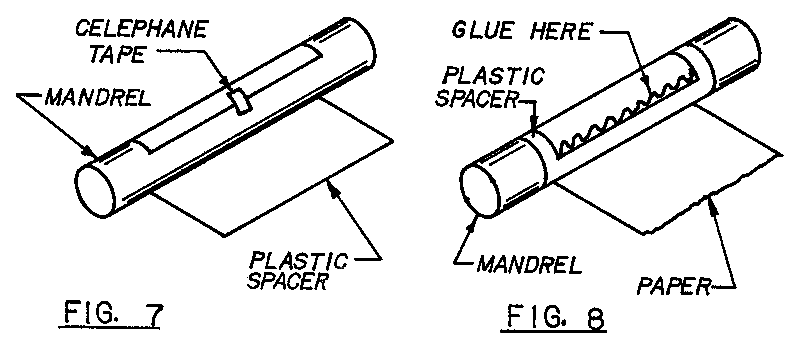
Before the cases are rolled, a plastic spacer must be cut. The same diameter dowel that is used to roll the casing on is used to compress the propellant in the casing later. The casing is wound very tightly on the spindle so the spacer performs two functions. First the plastic spacer is rolled tightly on the mandrel and then the paper is wound and glued to itself over the plastic. The plastic is slick and so allows the mandrel to be easily removed from the casing. This is not as easy if the paper is wound directly on the mandrel. Second, when the plastic spacer is removed from the case, the inside diameter is a few thousandths larger than the mandrel. When the propellant is then compressed into the case, the loading dowels can be easily removed.
The plastic spacer can be made from nearly any thin flexible plastic sheet. Four mil polyethylene such as is used for storm windows will work well. The spacer should be cut about an inch wider than the rocket case is long. The length should be cut so that it will wrap between l½ and 2 times around the mandrel.
Cases should be rolled on a smooth flat working surface that is not harmed by water. A Formica covered table top will work fine. Do not use a wood table top. A 2½ to 3 foot square piece of plywood or Masonite painted with a plastic finish can also be used.
Before beginning rolling cases assemble all your supplies. You will need your working surface, paper strips, rolling mandrel, plastic spacer, a bowl of water, cleaning rag or old wash cloth, old towel or rag for drying, bowl of thinned glue and a small sponge.
The glue should be thin enough to spread easily on the paper and be soaked up by the sponge but not so thin that it soaks into the paper and dries before it can be rolled. It should be only thin enough to make it easy to work with. If it is too thin the finished dry case will be soft and flexible instead of hard and rigid. The sponge should be as wide as the paper to be glued when making smaller rockets but should not be more than three or four inches wide.
To roll the case first roll the spacer tightly around the mandrel. Lay the plastic on your working surface. Lay the mandrel on the edge closest to you and roll the plastic onto the mandrel rolling it away from you. To help roll it tightly, a small piece of cellophane tape can be used in the middle of the plastic to hold the first edge in place on the mandrel. (see Figure 7) Next lay the paper on the working surface as you did with the plastic and begin rolling it over the plastic in the same direction. Do not use any tape on the paper. Be very careful at all times that the plastic and paper are tight. Loosely wrapped cases with air spaces will be weaker and will burst when the engines are loaded or fired. Make one half wrap of paper around the plastic and then spread glue along the first edge on the top surface. (see Figure 8) Then continue to roll the paper until this surface contacts the inside surface of the paper laying on the working surface. This step is very important and must be done very carefully and tightly. If this first wrap is not completely tight around the mandrel, it will be impossible to roll the remaining wraps tightly. There must be no glue between the paper and plastic surfaces or it will not be possible to remove the spacer without damaging the inside surface of the case. If the edge of the paper on the inside of the case is not glued securely it will wrinkle and tear when the engine is loaded. This will cause voids in the propellant that will cause the engine to malfunction.
After the first wrap is made tightly, the remainder of the rolling is relatively easy and rapid. Spread glue over the remaining surface of the paper. Hold the far edge of the paper with one hand spreading the two corners and holding them in tension. Pull the roll stretching the paper lengthwise slightly and roll the paper. Stop and pull the roll once or twice more as you roll the paper. Pressing the case against the working surface as you roll it will also help roll it tightly. If the paper begins to roll crooked, press harder on the lagging side or stretch the leading side a little tighter to correct the situation. Be very careful to start rolling the paper straight and apply even pressure as you roll to keep it rolling straight. Trying to correct the direction of roll increases the possibility of air gaps and a loosely rolled end on the case. Rolling casings takes practice. Don't be discouraged if the first one or two come out less than perfect.
After glue is spread on the paper, it must be rolled very quickly to prevent wrinkles. It may help to spread glue on two or three sections one at a time and just roll it as far as the glue before spreading on the next section. For the second and all succeeding layers of paper, glue can be spread right up to the leading edge when starting that sheet. If when you finish rolling a sheet the last edge is not adhered well to the roll, either the glue is too thin or too much time was spent rolling the paper.
Continue to wrap successive layers of paper until the case has the proper outside diameter for the engine being built. (Consult the dimensions chart.) To remove the mandrel and plastic spacer, grasp the outside of the case and rotate the mandrel and plastic spacer the opposite direction from which it was rolled. This will loosen it and detach the tape if any was used. The mandrel and spacer should slide out together. If the mandrel comes out first the spacer can be removed by grasping an inside corner and twisting it in the opposite direction from what the case was rolled. This will roll the spacer into a smaller roll and pull it away from the inside of the case so it can be removed. You may have some glue on the surface of the plastic. This will have to be washed off and dried before rolling the next tube.
Your working surface will accumulate glue and must be washed off completely and dried occasionally. Usually three to six sheets can be rolled before they begin sticking to the working surface but it may have to be washed and dried after each sheet to start with. Be sure to wash out your sponge and rags thoroughly when you are finished before they have dried or the glue cannot be washed out at all.
When the cases are finished, they should dry partially before being loaded. The 1/4" and 3/8" can be dried completely but the larger casings should still be flexible and slightly moist to prevent internal splitting when they are loaded. This will also allow the nozzle clay to seat firmly in the casing.
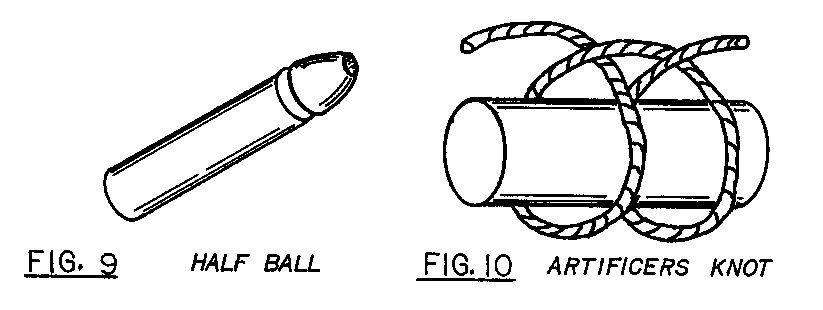
A less efficient engine can be built by choking the case instead of using a clay nozzle. Choking is done as soon as the cases are rolled before the glue has dried. A "half ball” is made from a dowel the same diameter as the mandrel. A hole is drilled in the end of the dowel half it's diameter about two diameters deep. The end is sanded to a rounded shape and then cut off the end of the dowel. (see Figure 9) This is used to shape the nozzle end of the case.
A smaller dowel half the diameter of the mandrel is placed through the half ball and is used to control the nozzle orifice size. A length of twine is wrapped twice around the case about l½ diameters from the end and formed into the "artificers knot." (Clove hitch--see Figure 10) A long piece is used and tied around a stick at each end. One end is stood on and the other end is pulled by hand to squeeze the tube. The old artificers would secure the twine or cord to something firm like a hook on a wall, tie the other end to a stick, put it between their legs and lean back on it with their weight to choke the larger cases. The half ball is placed in the end of the case just below the twine loops and held in place. The orifice dowel is extended through the hole and into the case past the twine. The case is rotated as
the twine is tightened so that the choking is accomplished as evenly as possible. The twine is then cut, the knot left on the case, the half ball and orifice dowel removed and the finished case set aside to dry.
It is a good idea to construct the mold before rolling the cases. The cases can then be placed in the mold and checked for a good fit. They should be larger than the mold bore so the mold lacks at least a sixteenth of an inch from closing on each side. If the cases are rolled the right size to begin with, it will eliminate the need for shimming it with additional paper later.
| ◄ first page | ◄ previous page | next page ► | last page ► |